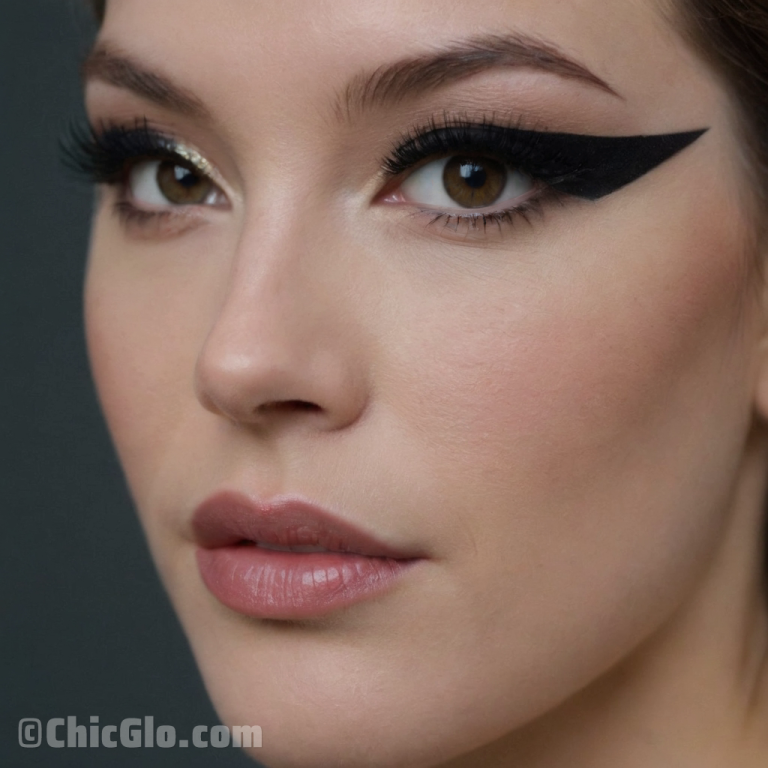
Achieving a dramatic winged eyeliner look can transform your appearance, adding a touch of bold elegance to your makeup routine. This guide will walk you through the materials you’ll need and provide detailed steps to recreate the striking look shown in the image.
Materials Needed
- Primer
- Ensures a smooth base and longevity for your makeup.
- Foundation
- For an even skin tone and flawless base.
- Concealer
- To cover any imperfections and brighten the under-eye area.
- Setting Powder
- To set the foundation and concealer.
- Eyebrow Pencil/Gel
- For well-defined brows.
- Eyeshadow Primer
- To prevent creasing and enhance the eyeshadow’s color.
- Neutral Eyeshadow Palette
- For a subtle base and transition shades.
- Black Gel or Liquid Eyeliner
- For creating the bold winged eyeliner.
- Gold Shimmery Eyeshadow
- To add a touch of sparkle to the inner corners of the eyes.
- Mascara
- To lengthen and volumize the lashes.
- False Eyelashes (Optional)
- For added drama and volume.
- Blush
- To add a hint of color to the cheeks.
- Highlighter
- For a subtle glow on the high points of the face.
- Lip Liner
- To define the lips.
- Matte Nude Lipstick
- For a natural yet polished look.
- Makeup Brushes and Tools
- Including a beauty blender, eyeshadow brushes, and an eyeliner brush.
Step-by-Step Guide
Step 1: Prep Your Face
Start with a clean and moisturized face. Apply a primer to ensure your makeup stays in place all day.
Step 2: Create a Flawless Base
Apply foundation evenly across your face using a brush or beauty blender. Follow with concealer under the eyes, on the bridge of the nose, and on any blemishes. Set the foundation and concealer with a setting powder to prevent creasing and shine.
Step 3: Define Your Brows
Using an eyebrow pencil or gel, fill in your brows to give them a defined and polished look.
Step 4: Prime Your Eyelids
Apply an eyeshadow primer to your eyelids to create a smooth canvas and help the eyeshadow last longer.
Step 5: Apply Neutral Eyeshadow
Using a neutral eyeshadow palette, apply a light beige or taupe shade all over your eyelid as a base. Blend a slightly darker shade into the crease to add depth.
Step 6: Highlight the Inner Corners
Apply a gold shimmery eyeshadow to the inner corners of your eyes to make them pop and add a touch of glamour.
Step 7: Create the Winged Eyeliner
This is the focal point of the look. Using a black gel or liquid eyeliner, start from the inner corner of your eye and draw a thin line along your upper lash line. Gradually make the line thicker as you reach the outer corner. Extend the line outward and upward to create a dramatic wing. Fill in any gaps and ensure both eyes are symmetrical.
Step 8: Apply Mascara (and False Lashes)
Apply mascara to your upper and lower lashes, wiggling the wand from the base to the tips for maximum volume and length. For extra drama, apply false eyelashes.
Step 9: Add Blush and Highlighter
Lightly apply blush to the apples of your cheeks for a natural flush. Add highlighter to the high points of your face, such as the cheekbones, brow bone, and the bridge of your nose, for a subtle glow.
Step 10: Define and Fill Lips
Outline your lips with a nude lip liner to define their shape. Fill in with a matte nude lipstick for a sophisticated finish.
Conclusion
And there you have it! A step-by-step guide to achieving the dramatic winged eyeliner look. With the right materials and a bit of practice, you can master this striking makeup style and make a bold statement. Whether for a special occasion or just to add a touch of glam to your everyday look, this guide has you covered. Happy makeup applying!
